

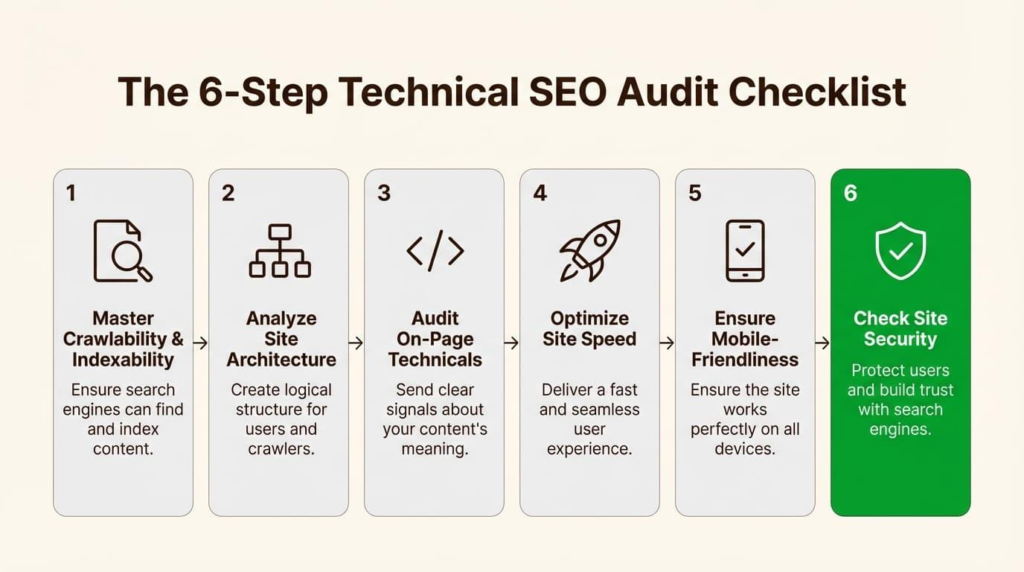
A technically strong website gives search engines a clear path to discover, crawl, render, understand, and index its important pages. When technical problems interfere with any of these stages, even excellent content can struggle to reach its intended audience.
A technical SEO audit is a systematic examination of the website’s infrastructure and search accessibility. It can reveal problems such as blocked crawlers, incorrect canonical tags, broken redirects, duplicate URLs, poor internal linking, JavaScript rendering issues, slow pages, and incorrect structured data.
The goal isn’t to make every SEO tool report a perfect score. Instead, a useful audit identifies issues that can affect search visibility, crawling, indexing, accessibility, and user experience, then prioritizes fixes according to their potential impact.
What Is a Technical SEO Audit?
A technical SEO audit examines the behind-the-scenes elements that influence how search engines access and interpret a website.
A typical audit covers:
- Crawl ability
- Index ability
- XML sitemaps
- Robots.txt
- URL structure
- HTTP and redirects
- Canonicalization
- Internal linking
- JavaScript rendering
- Mobile usability
- Core Web Vitals
- Structured data
- Broken pages and server errors
- International SEO implementation
- Website architecture
Google explains that search involves discovering URLs, crawling pages, processing and rendering content, and indexing information before pages can potentially appear in results.
Step 1: Crawl the Website
Start by obtaining a complete picture of the site’s URLs.
Tools such as Screaming Frog, Site bulb, Semrush, or similar crawlers can identify technical problems at scale.
Check for:
- 4xx errors
- 5xx server errors
- Redirect chains
- Redirect loops
- Broken internal links
- Missing title tags
- Duplicate URLs
- Canonical inconsistencies
- Orphan pages
- Pages blocked from crawling
- Excessive URL parameters
For example, suppose an e-commerce website has 50,000 product URLs, but thousands are generated by filters such as:
/shoes?color=black&size=10
If these URL variations create unnecessary crawl able combinations, the crawler may spend resources discovering pages that aren’t useful search destinations.
Practical tip: Export the crawl data and separate issues into critical, important, and informational categories rather than trying to fix everything simultaneously.
Step 2: Check Robots.txt
Open:
https://example.com/robots.txt
The robots.txt file provides crawler instructions for paths that automated crawlers may access. Google supports the Robots Exclusion Protocol and notes that robots.txt is a crawling control mechanism, not a reliable method for keeping URLs out of the Google index.
Look for:
- Accidentally blocked important directories
- Incorrect Disallow rules
- Missing sitemap references
- Development or staging paths exposed unintentionally
- Overly broad blocking rules
For example:
User-agent: *
Disallow: /admin/
Disallow: /private/
Sitemap: https://example.com/sitemap.xml
Be particularly careful with rules such as:
Disallow: /
A mistake like this can prevent search-engine crawlers from accessing substantial portions of a website.
Step 3: Audit XML Sitemaps
An XML sitemap helps search engines discover URLs, particularly on large, complex, or frequently updated websites. Google recommends including the URLs you want to appear in search results rather than every URL the website happens to generate.
Check whether your sitemap:
- Loads correctly
- Uses absolute URLs
- Contains canonical URLs
- Avoids unnecessary redirects
- Excludes 404 pages
- Excludes pages with no index
- Contains updated last mod information where appropriate
- Is submitted through Google Search Console
Google states that an individual sitemap is limited to 50 MB uncompressed or 50,000 URLs, after which multiple sitemaps or a sitemap index can be used.
Example
If your sitemap contains:
https://example.com/old-product
but /old-product returns a 404, remove it from the sitemap.
Think of your sitemap as a curated list of URLs you want search engines to discover—not a database dump of every URL on the site.
Step 4: Inspect Index ability
A page can be crawl able without necessarily being indexed.
Use Google Search Console’s URL Inspection tool to investigate important URLs.
Check:
- Whether the URL is indexed
- Google-selected canonical
- User-declared canonical
- Crawl status
- Mobile usability
- Enhancements
- Last crawl information
Common index ability problems
Look for:
- no index on valuable pages
- Canonical pointing to another URL
- Pages returning unexpected status codes
- Duplicate content
- Soft 404 situations
- Login requirements
- Important content unavailable to crawlers
Don’t assume that every excluded URL needs to be indexed. A strong audit distinguishes between intentional exclusions and accidental exclusions.
Step 5: Review Canonical Tags
Canonicalization helps search engines understand which URL represents a piece of duplicate or substantially similar content.
For example:
https://example.com/product/shoes
https://example.com/product/shoes?color=black
may create URL variations that require careful handling.
Google describes redirects and rel=”canonical” as strong canonicalization signals, while sitemap inclusion is a weaker signal.
Audit these elements:
- Self-referencing canonical
- Canonical pointing to valid URLs
- Canonical URLs returning 200 status
- Consistency between canonical and sitemaps
- HTTP versus HTTP versions
- www versus non-www versions
- Parameter-based duplicates
Avoid using robots.txt as a canonicalization mechanism. Google specifically advises against it for this purpose.
Step 6: Check Redirects and HTTP Status Codes
Every important URL should produce an appropriate response.
Common status codes
200: Page successfully loads.
301: Permanent redirect.
302: Temporary redirect.
404: Resource doesn’t exist.
410: Resource has been permanently removed.
500: Server-side error.
Pay particular attention to redirect chains:
Old URL → Redirect 1 → Redirect 2 → Final URL
Ideally, outdated URLs should redirect directly to their intended destination where appropriate.
Also check whether:
http://example.com
http://www.example.com
resolve consistently to the preferred version.
Step 7: Audit Website Architecture and Internal Links
Search engines discover pages through links as well as other discovery mechanisms.
Google recommends making important pages reachable through crawl able links and using appropriate <a> elements.
Review:
- Navigation
- Breadcrumbs
- Category structures
- Contextual internal links
- Orphan pages
- Click depth
- Broken internal links
- Links pointing to redirected URLs
For example, an e-commerce structure could look like:
Homepage → Category → Subcategory → Product
A blog might use:
Homepage → Topic Hub → Supporting Article
Internal linking should help both users and search engines understand the relationships between pages.
Step 8: Test Mobile Experience
A technical audit should examine the mobile version of the website, not simply assume that desktop performance represents mobile users.
Check:
- Responsive layout
- Navigation
- Text readability
- Buttons and interactive elements
- Images
- Forms
- Horizontal scrolling
- Mobile page speed
- Content parity
Google’s page-experience guidance includes mobile usability, secure delivery, Core Web Vitals, and avoiding intrusive experiences among the areas site owners should evaluate.
Step 9: Analyze Core Web Vitals and Performance
Website performance is both a technical and user-experience consideration.
The current Core Web Vitals are:
- LCP — Largest Contentful Paint
- INP — Interaction to Next Paint
- CLS — Cumulative Layout Shift
Google’s PageSpeed Insights combines laboratory diagnostics with real-user data when sufficient field data is available.
Common performance problems
- Oversize images
- Unused JavaScript
- Excessive third-party scripts
- Render-blocking resources
- Slow server response
- Poor caching
- Layout shifts
- Heavy web fonts
Don’t optimize purely for a laboratory score. Compare lab diagnostics with real-user data where available.
Step 10: Check JavaScript Rendering
Modern websites frequently depend on JavaScript frameworks.
Review whether important content, links, metadata, and structured data are available to search engines after rendering.
Potential problems include:
- Content loaded only after user interaction
- Important links generated incorrectly
- Client-side routing problems
- Empty HTML shells
- JavaScript errors
- Incorrect canonical manipulation
- Content unavailable during rendering
Google can process JavaScript, but Google also recommends accounting for differences in how crawlers access and render JavaScript-driven websites.
Step 11: Validate Structured Data
Structured data provides machine-readable information about page content.
Depending on the website, relevant markup may include:
- Article
- Breadcrumb
- Organization
- Product
- LocalBusiness
- SoftwareApplication
- Other supported structured-data types
Google recommends validating structured data with its testing tools and ensuring that the markup accurately represents visible page content.
Google Search Central — Structured Data Documentation
Important: adding structured data doesn’t guarantee that Google will display a rich result.
Step 12: Review URL Structure
URLs should be understandable to users and search engines.
For example:
Better:
example.com/technical-seo-audit
Less descriptive:
example.com/page?id=83947
Google recommends using simple, descriptive URL structures where practical.
Check for:
- Excessive parameters
- Unnecessary capitalization
- Duplicate URL variations
- Inconsistent trailing slashes
- Deep or confusing folder structures
- Session IDs in URLs
Step 13: Audit International SEO When Applicable
For multilingual or multinational websites, check:
- hreflang implementation
- Language-specific URLs
- Country targeting
- Canonical relationships
- Reciprocal hreflang references
- Correct language/region codes
- Duplicate localized pages
For example:
<link rel=”alternate”
hreflang=”en-us”
Ahrefs”https://example.com/us/page”>
International SEO mistakes can cause search engines to misunderstand which localized page should be presented to users.
Step 14: Create a Prioritized SEO Action Plan
An audit is only useful if it leads to practical improvements.
Create a spreadsheet with columns such as:
| Issue | URL/Area | Impact | Priority | Recommended Fix | Status |
| Broken internal links | Blog | Medium | High | Update destinations | Open |
| Incorrect canonical | Products | High | High | Correct canonical | Open |
| Slow LCP | Homepage | High | Medium | Optimize hero resources | Open |
| Missing sitemap | Sitewide | Medium | Medium | Generate sitemap | Open |
Prioritize problems based on search accessibility, number of affected URLs, business importance, user impact, and implementation effort.
Technical SEO Audit Checklist
Before finishing your audit, verify:
- Website can be crawled
- Robots.txt is correct
- XML sitemap works
- Important URLs are index able
- Canonical are consistent
- Redirects work correctly
- 404/500 errors are investigated
- Internal links work
- Important pages aren’t orphaned
- Mobile experience is functional
- Core Web Vitals are reviewed
- JavaScript rendering is tested
- Structured data is validated
- URLs are logical
- HTTP is implemented correctly
- International targeting is checked where applicable
- Fixes are documented and prioritized
Conclusion
A technical SEO audit isn’t simply a hunt for errors. It is a structured process for understanding whether a website can be discovered, crawled, rendered, understood, and indexed effectively.
The most valuable audits connect technical findings to real outcomes. Instead of chasing every warning from an SEO crawler, focus on issues that affect important pages, search accessibility, user experience, and the website’s ability to communicate clearly with search engines.
Start with crawling and indexing, move through architecture and canonicalization, then evaluate performance, JavaScript, structured data, and specialized requirements such as international SEO. Finally, document every issue and create a prioritized implementation plan.
Regular technical audits are particularly useful after website migrations, redesigns, CS changes, major template updates, URL restructuring, or large-scale content launches. When technical SEO becomes part of ongoing website maintenance rather than a one-time project, problems can be detected and addressed before they become larger search or usability issues.
Also Read
- ► How to Rank on Google Without Backlinks: A Practical SEO Guide
- ► How to Grow Website Traffic by 200% in 3 Months
- ► The Impact of Social Media on Content Distribution
- ► Mastering the Art of SEO: Effective Blogging Techniques for 2026
- ► The Importance of SEO in Content Creation
- ► How to Identify High-Quality Blogs for Guest Posting
- ► Strategy to Build an Email List Using Guest Blogging
- ► Guest Blogging Strategies for Local Businesses
- ► The Role of Visual Content in Guest Posts
- ► The Role of Influencers in Guest Blogging
- ► Guest Blogging Impact in Different Industries
- ► How to Repurpose Guest Posts for Maximum Reach
- ► Guest Blogging Strategies for E-Commerce Sales
- ► Unlocking the Real Power of Backlinks in SEO
- ► The Essential Role of Content in Guest Blogging

Leave a Reply